Showing posts with label design. Show all posts

Friday, August 5, 2011

Rad Cookies by Manjar


These quirky cool designed cookies by Manjar are some of the best I've seen in a long time. They made me look twice. Those cute cameras!

Photos from Manjar // via A Merry Mishap

Thursday, August 4, 2011

Elegant Macarons : Theurel & Thomas


The design concept for Theurel & Thomas pâtisserie in San Pedro Mexico made me gasp. Anagrama did an amazing job designing the branding to exclusively highlight the macarons in a beautiful way, and to top it off they continued it into the retail space. Gorgeous!

All photos from Anagrama

Thursday, July 28, 2011

Mother of Beauty : Eva from Sycamore Street Press


Several months ago around Mother's Day I asked a few of my favorite creative online mothers to answer a few questions about motherhood. I am excited to share what Eva from Sycamore Street Press had to say! Her and her husband Kirk are super creative, talented and run the letterpress shop Sycamore Street Press in the beautiful mountainous valley in Heber City. They had a sweet baby girl, Ingrid back in November, recently launched their new letterpress collection, and are teaching letterpress classes with slots now open in September now too! I think Eva is such a cool and lovely person and I really enjoy what she had to share, hope you do as well...


1. What is your favorite part of being a new mom? Is it different than you thought?


My life feels complete. When Ingrid came along, something just clicked. I love the small moments. Like when she finishes nursing and looks up at me and starts to coo. Or when I go to get her up from a nap and am greeted by the biggest crinkly nose grin ever. I could just melt. I suspected it would be like this, but I still couldn't have imagined how much joy one tiny human could give me!


2. What is your daily schedule like now and how does blogging fit into that?


The first few months were like a marathon with unexpected twists and turns and an always receding finish line. But once she hit about 4 months, things calmed down and we were able to get on more of a schedule. It's been so nice! Ingrid wakes Kirk and I up every morning around 6:30 or so. I nurse her and we both play with her in bed for a little bit before we start the day. During her morning and afternoon naps, I try and get as much work done as possible. But often it feels like I am just getting started when she wakes up! While she's awake we play, read books, do housework, etc... And I take her and the dog on a walk down our country road, weather permitting. She goes to bed early -- about 5:30. When she does, I really get down to work. Lately, we've been really busy preparing for the launch of our 2011 collection, so I'll often be up until 11 or 12 editing images, writing descriptions, blogging, returning emails, etc... But of course, it can vary a lot from day to day! And I actually wrote an in depth "day in the life" post on my blog.


3. How do you find or seek after balance with being a mom and running Sycamore Street Press?


It's tough. I can have a hard time focusing on the task at hand. When I'm caring for Ingrid, I'll sometimes try to answer a few emails (much to her consternation). But in the evening when I'm at the computer working, I'll end up opening iPhoto so I can look at all the pictures of her!


Overall, though, Ingrid has really helped me live a more balanced life. Before I had her, I was such a workaholic. These days I take more time to spend with family, friends, and in nature. Sure, I don't get as much work done for Sycamore Street Press as when I spent 12-18 hour days at the studio. But I'm starting to realize that in the grand scheme of life, it's a good thing!


Another big step for me in finding balance is to get help. Since SSP began, I've teamed up with my friends Amy Shaffer, Kristin Mills, and Stephanie Ford to create the designs for our letterpress goods. Then, a couple of years ago, Kirk joined me full time in printing and running the business. It's made all the difference. This summer, we're looking to bring on a couple of interns as well. As for the domestic side of things, once or twice a week one of Ingrid's grandmothers will come and watch her. And I've started having someone come in and clean our place for a couple of hours each week. I'm not gonna pretend that I do it all on my own. I feel so grateful for the help I have!


 p.s. Have you seen this toast that Amy Poehler gave recently about how she's able to "do it all"?


4. What qualities in your own mother and/or women around you do you admire most?


Love. First and foremost. The way they'll do whatever it takes to help their children and family. My mom has always been that way. Also -- even with 4 kids at home, she was still able to find some time for creative projects. Painting, knitting, gardening, cooking, decorating... I grew up seeing my mom do these things, and it definitely influenced who I am and what I do today.


5. What is really inspiring you at the moment?

The resilience of the Japanese people. Instagram. Ingrid... and her mostly thrifted, gifted, or handed down wardrobe. Lykke Li. Our morning walks through the juniper tree forest. Spring, and all it's beautiful blossoms. Secrets from a Stylist. The fuss and flurry of launching a new collection. Pippi Longstocking. Miss Moss...

Thanks so much Eva!

Wednesday, July 27, 2011

How to make a blogger template : data tags -part 2

In previous post ,I told you about data tags for some widgets . In this post ,we continue to the last and most important widget : blogpost widget . This widget is used to show posts in a blog . Without this widget ,we can't blogging .

Now let's see blogpost widget's data tags :
  •     <data:feedLinks/>: A list of feeds for this page. On the main page, this will contain the main blog feeds; on item pages, this will also contain comments feeds. Each item in this list contains the following:
  •     <data:feedLinks.url/>: The feed URL.
  •     <data:feedLinks.name/>: The feed name (i.e. 'Posts' or 'Comments').
  •     <data:feedLinks.feedType/>: The type of feed (Atom or RSS).
  •     <data:feedLinks.mimeType/>: The mime type of the feed.
  •     <data:olderPageUrl/>: If there are older posts than the ones on the current page, this is a URL to those posts. Context-sensitive for page type. (Not all pages will have this link.)
  •     <data:olderPageTitle/>: Title of the link to the older page of posts. It's usually the text "Older Posts"
  •     <data:newerPageUrl/>: The newer equivalent of olderPageUrl.
  •     <data:newerPageTitle/>: The newer equivalent of olderPageTitle.
  •     <data:commentLabel/>: The phrase to use to show the number of comments, e.g. "comments."
  •     <data:authorLabel/>: The phrase to use to indicate who wrote the post, e.g. "posted by."
  •     <data:timestampLabel/>: The phrase to use to indicate when the post was written, e.g. "posted at."
  •     <data:postLabelsLabel/>: Phrase to introduce the list of post labels, e.g. "labels for this post."
  •     <data:backlinksLabel/>: Phrase to describe backlinks to this post, e.g. "links to this post."
  •     <data:posts/>: A list of all posts for this page. You can consider it a set ,and each post is an item in this set . We can refer to post's properties by the following tags:
  •     <data:post.dateHeader/>: The date of this post, only present if this is the first post in the list that was posted on this day.
  •     <data:post.id/>: The numeric post ID.
  •     <data:post.title/:> The post's title.
  •     <data:post.body/>: The content of the post.
  •     <data:post.author/>: The display name of the post author.
  •     <data:post.url/>: The permalink of this post.
  •     <data:post.timestamp/>: The post's timestamp. Unlike dateHeader, this exists for every post.
  •     <data:post.labels/>: The list of the post's labels. Each label contains the following:
  •     <data:label.name/>: The label text.
  •     <data:label.url/>: The URL of the page that lists all posts in this blog with this label.
  •     <data:label.isLast/>: True or false. Whether this label is the last one in the list (useful for placing commas).
  •     <data:post.allowComments/>: 'True' if this post allows comments.
  •     <data:post.numComments/>: The number of comments on this post.
  •     <data:post.showBacklinks>: Whether to show backlinks for this post.
  •     <data:post.numBacklinks/>: Number of backlinks for this post.
  •     <data:post.addCommentUrl/>: The URL of the 'add a comment' form for this post.
  •     <data:post.emailPostUrl/>: The URL of the 'email this post' form for this post.
  •     <data:post.editUrl/>: The URL of the edit form for this post.
  •     <data:feedLinks/>: A list of feeds specific to this post. (This is different from the overall blog feedLinks, as it may contain a feed for the post's comments, for instance.) Each contains the following:
  •     <data:feedLink.url/>: The feed URL.
  •     <data:feedLink.name/>: The feed name (e.g. 'Posts' or 'Comments').
  •     <data:feedLink.feedType/>: The type of feed (Atom or RSS).
  •     <data:feedLink.mimeType/>: The mime type of the feed.
  •     <data:comments/>: A list of all comments for this post (on item pages only). Each contains the following:
  •     <data:comment.id/>: The numeric ID of the comment.
  •     <data:comment.body/>: The body of the comment.
  •     <data:comment.timestamp/>: The time the comment was created.
  •     <data:comment.author/>: The display name of the comment's author, or 'Anonymous'.
  •     <data:comment.authorUrl/>: URL of the comment author's profile, if the comment is not anonymous.
  •     <data:comment.deleteUrl/>: The URL for deleting this comment.
  •     <data:comment.isDeleted/>: Whether this comment has been deleted. (The text of deleted comments is replaced with a placeholder.) 

Tuesday, July 26, 2011

Grady McFerrin


I recently popped over to Grady McFerrin's website and was impressed all over again with the brilliant artwork he has been doing lately. An inspirational artist for sure!

Wednesday, July 20, 2011

Speaking Digitally: Lion + Meeble Mail

Summer often seems to me like a time to shake things up, so here at Black Eiffel I am going to be bringing you some new regular features that I have been working on and am really excited about! My first new feature is called 'Speaking Digitally' where I will highlight and talk about my nerdy obsession with all things related to technology. Are you a tech-nerd too? Do speak up.


I guess you may understand a bit of my technology fascination when I tell you about what happened this morning. Quietly in the dark to not wake our girls, my husband and I huddled around our computer as we installed Lion early this morning. Are we geeks or what? Did you Mac users download it already today? I'm excited explore the new features and I am thrilled that the update is only 30 bones. Roar!


Another cool thing I recently learned about is Meeble Mail, which is an online website that helps you add a little fancy flair to your emails with their pretty designed stationery templates. It inserts directly into your many email clients like gmail, yahoo and more. Simply select and purchase your email stationery for around $4.99, customize it and you are off and you can use the stationery as much as you want. I dig that they have stationery designs from some of my favorite stationery designers like Jack and Lulu, Linda & Harriett as well as fashion designer's patterns.

Although I am partial to receiving an old school pretty letter in the snail mail, this is a perfect option to make your email stand out with style. Learn more about Meeble Mail here and check out all of the other fun stationery templates.

Tuesday, July 19, 2011

Pino Branding


The work by The Bond Agency and this Pino Branding is quite brilliant.

Tuesday, July 12, 2011

How to make a blogger template : the header

As mentioned in previous post on blogger template structure ,there are 4 main parts in a blogger template . Part 1 contain information on xml format ,and we can ignore this part because there's nothing to do here .
For the part 2 ,the header ,here is the first thing we should care for a blogger template .

In a default blogger template , there are only two lines in this part :
 <b:include data='blog' name='all-head-content'/>
    <title><data:blog.pageTitle/></title>

The first line
 <b:include data='blog' name='all-head-content'/>
 
will insert necessary meta tags to the header automatically . If you view source code of a page in your blogspot's blog ,what will you see ? Something like that :

 <meta content='text/html; charset=UTF-8' http-equiv='Content-Type'/>
<meta content='true' name='MSSmartTagsPreventParsing'/>
<meta content='blogger' name='generator'/>
.....................
There's no line  <b:include data='blog' name='all-head-content'/> .
It's replaced with meta tags , links to favicon ,link to default CSS, script file...

The next one
<title><data:blog.pageTitle/></title>
is rendered to the title tag in header
<title>blog titles .....blah blah ...</title> 

What should we do with header ?

-You can add your own meta tags for 'site description' ,'keywords' , like these :
<meta content='your blog description goes here' name='description'/>
        <meta content='your blog keywords ....' name='keywords'/>  
-Add your own favicon
<link href='link to your favicon.ico' rel='icon' type='image/vnd.microsoft.icon'/>
-Add link to outside script files or css files

A small tip

Every page in blog should have description and keywords that close to the page's content,it's what google said in their SEO tip .
In Blogger ,we can't follow this advice exactly ,but we can try our best ,by using what Blogger provide .

We can use this code in the header
<b:if cond='data:blog.pageType == &quot;index&quot;'>
<title><data:blog.title/></title>
......... meta tags for the homepage ....
<b:else/>
<b:if cond='data:blog.pageType == &quot;archive&quot;'>
<title><data:blog.title/></title>
....meta tags for category page (or archive page)....
<b:else/>
<b:if cond='data:blog.pageType == &quot;item&quot;'>
<title><data:blog.pageName/></title>
.... meta tags for single post ...

</b:if>
</b:if>
</b:if>

The code above means : 

-if the current page is homepage ,it show the meta tags for homepage in header and blog title in title
-if the current page is category page ( page that contain a list of posts under a specific category ) ,it show the meta tags for category page in header and blog title in title
-if the current page is a single post ,it show meta tags in header and title of post in title .

By using this code ,we can narrow the meta tag (keywords,page description) and title for every page type . Although we can't add keywords ,page description for a specific post ,but it's still better than do nothing ,isn't it ?
That's all for the header . In the next posts ,I will move to other parts in a blogger template , steps to make a HTML template , convert it to Blogger , and tools for this work .

Thursday, July 7, 2011

Nine Cakes


Speaking of Tara yesterday, she also shared with me a recent design projects which included the branding of the website Nine Cakes. Aren't those cakes gorgeous!


(Photos by Jen Huang from Nine Cakes)

Wednesday, July 6, 2011

How to solve CSS errors in Blogger template using Firebug

Knowing CSS can help you in solving Blogger template errors ,or make some customization . But how to do that ? how to find where is the trouble or find what CSS attribute you need to change when  make customization ? In this post ,I will show you what I did : using Firebug (a Firefox add-on ) to work with CSS .
Firebug is a great add-on of Firefox browser ,it's very popular in web development because it can help us inspecting website elements ,debugging errors in CSS ,script ,seeing web layout ....
To use Firebug ,first ,Firefox browser must be installed in your PC . Then go to website : http://getfirebug.com/ ,click on Install Firebug to get the latest version and installed this add-on to Firefox .

After installing Firebug ,you will see an new button in browser window ,this button has the image of a bug .

Enter the Blogger blog you want to fix errors or make customization
When the page fully loaded ,click on firebug button ,the firebug window will appear at the bottom of browser window .

Click on the arrow button in firebug window
 
After click this button ,there will be a rectangle around the element that the mouse is pointing .  Move your mouse pointer to the element you want to change size or fix error
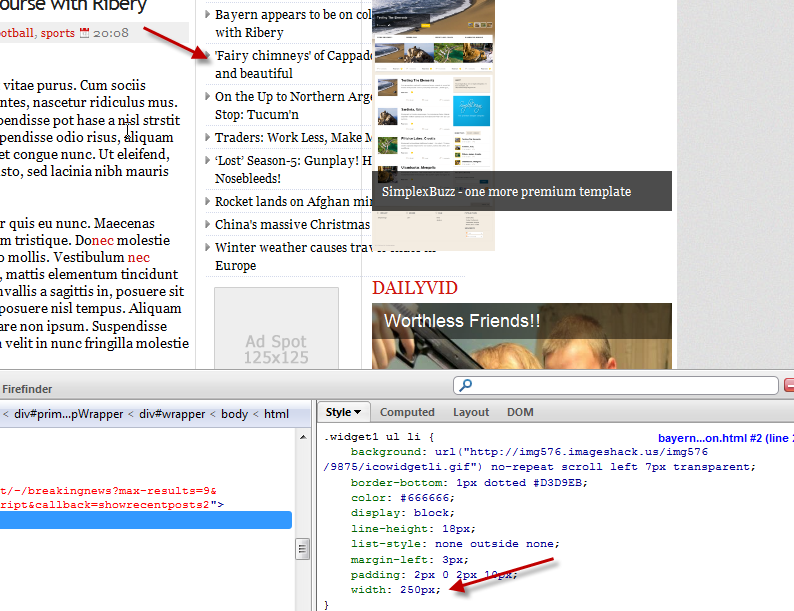
In the right panel of firebug window ,you will see the CSS tags of element which you are pointing .


You can click on the value of these CSS attributes to change value of them ,for example ,in this picture ,I changed width of an element in the right panel ,and see how it look after changing immediately in browser window .
You can also add more attributes to a CSS tags to make it display as you want ,for example ,you want color of all text in an element changed to white color,just right click on right-panel and ,choose new property ,and then add color:#fff;

That's very easy and fun because you can see how your site is right after making changes .

But how to know which CSS need to change ,or meaning of CSS tags or what need to add to make it display as you want ? You can see it easily in my previous post : 31 online CSS cheatsheets that may helpful .

You can use Firebug to see the element layout ,the right or left margin ,padding... in Layout tab in right panel .
When you finish the work ,just go to Blogger template (xml file) ,and add the tags or attributes that you've just added in Firebugs to your template .
There're many functions that Firebug can help you in finding bugs and fixing errors .It's very easy to use ,believe me ,just need a little of time ,you can handle this software and make it work for you ^^

Ink and Wit


With her talented designer ways Tara has created some more lovely things for Ink + Wit. I am especially drawn to all of the above items like the bird stamps, wooden cards and cute pencil holder! You can find many of them in her shop here and a few more of them are coming soon.
 

Tuesday, July 5, 2011

Artis Royal Zoo Ads


This is such a brilliant ad concept for the Artis Royal Zoo in Amsterdam designed by Dawn. Anyone can pull off the stickers from their signs and place them throughout the city to promote the zoo. Very cool! This video clip shares how it is done.

(Photos from Dawn / via Fubiz)

31 online CSS Cheatsheets that help

Believe it or not ,most of modifications in default Blogger templates that I did were CSS only . And the result are custom templates you see in SimplexDesign blog .Understanding CSS ,even a little can help you in changing elements in website/blog as you want .Changing in Font size,colors ,size of elements ,positions of elements... all of them are CSS ^^
But how can we remember all of them ,we are not developer and we have no time to do this . So here are 30 CSS cheatsheets ,that you can use for reference ,anytime you want to know about an attribute ,what they mean ,and the role of them ...
I hope this helpful to you
This information was found on this site ,and you can go there to get the original post and more interesting posts
This article is divided in 2 major Sections:
  1. CSS Cheatsheets
  2. CSS3 Cheatsheets

1,Most Practical CSS Cheat Sheet Yet

Most Practical CSS Cheat Sheet Yet
More Information on Most Practical CSS Cheat Sheet Yet

CSS Cheatsheets

2,CSS2 Help Sheet

CSS2 Help Sheet
More Information on CSS2 Help Sheet

3,Core CSS

Core CSS
More Information on Core CSS

4,CSS Cheat Sheet

CSS Cheat Sheet
More Information on CSS Cheat Sheet

5,Basic CSS Cheat Sheet

Basic CSS Cheat Sheet
More Information on Basic CSS Cheat Sheet

6,CSS CHEAT SHEET

CSS CHEAT SHEET
More Information on CSS CHEAT SHEET

7,CSS Layout Cheat Sheet

CSS Layout Cheat Sheet
More Information on CSS Layout Cheat Sheet

8,CSS Font Shorthand Property Cheat Sheet

CSS Font Shorthand Property Cheat Sheet
More Information on CSS Font Shorthand Property Cheat Sheet

9,CHEAT SHEET CSS SHORTHAND CODES

CHEAT SHEET CSS SHORTHAND CODES
More Information on CHEAT SHEET CSS SHORTHAND CODES

10,Blueprint CSS Cheat Sheet

Blueprint CSS Cheat Sheet
More Information on Blueprint CSS Cheat Sheet

11,CSS Shorthand Cheat Sheet

CSS Shorthand Cheat Sheet
More Information on CSS Shorthand Cheat Sheet

12,CSS Cheat Sheets

CSS Cheat Sheets
More Information on CSS Cheat Sheets

13,CSS Shorthand

CSS Shorthand
More Information on CSS Shorthand

14,CSS Specificity – Cheat Sheet

CSS Specificity - Cheat Sheet
More Information on CSS Specificity – Cheat Sheet

15,CSS Shorthand Cheat Sheet

CSS Shorthand Cheat Sheet
More Information on CSS Shorthand Cheat Sheet

16,CSS Cheatsheet

CSS Cheatsheet
More Information on CSS Cheatsheet

17,CSS Properties and Values

CSS Properties and Values
More Information on CSS Properties and Values

18,CSS Cheat Sheet

CSS Cheat Sheet
More Information on CSS Cheat Sheet

19,Cascading Style Sheets Quick Reference

Cascading Style Sheets Quick Reference
More Information on Cascading Style Sheets Quick Reference

20,CSS3 Cheatsheets

CSS3 Click Chart

CSS3 Click Chart
More Information on CSS3 Click Chart

21,CSS3 Help Sheet.

CSS3 Help Sheet.
More Information on CSS3 Help Sheet.

22,CSS 3 selector syntax

CSS 3 selector syntax
More Information on CSS 3 selector syntax

23,CSS3 Quick Reference Guide

CSS3 Quick Reference Guide
More Information on CSS3 Quick Reference Guide

24,CSS 3 Cheat Sheet

CSS 3 Cheat Sheet
More Information on CSS 3 Cheat Sheet

25,WebKit CSS3 Cheat Sheet

WebKit CSS3 Cheat Sheet
More Information on WebKit CSS3 Cheat Sheet

26,CSS3 Color Names

CSS3 Color Names
More Information on CSS3 Color Names

27,HTML5 and CSS 3 Cheat Sheets

HTML5 and CSS 3 Cheat Sheets
More Information on HTML5 and CSS 3 Cheat Sheets

28,HTML5 & CSS3 Support

HTML5 & CSS3 Support
More Information on HTML5 & CSS3 Support

29,CSS 3 cheat sheet

CSS 3 cheat sheet
More Information on CSS 3 cheat sheet

30,Compatibility tables for support of CSS3

Compatibility tables for support of CSS3
More Information on Compatibility tables for support of CSS3

31,CSS3 – Information and samples

CSS3 - Information and samples
More Information on CSS3 – Information and samples

(Source : http://slodive.com/freebies/css-cheat-sheets/ )