Showing posts with label blogger. Show all posts

Friday, August 5, 2011

How to make a blogger template : how blogspot widget work?

In previous posts ,you known the meaning of Blogger data tags ,now in this post ,we will see how blogspot widget ,the most important widget in blogger work .
Blogpost widget is the widget that show the process and show the blog post .
It contain many 'includable' inside ,this structure you can get from the post on widget.
Now let't see how it work

In a template , Blogpost widget start with this line
<b:widget id='Blog1' locked='true' title='Blog Posts' type='Blog'>

The id can be vary in different template ,but the type="Blog" is required
In this widget ,there are some 'includable' :
  • <b:includable id='main' var='top'> : main includable ,this includable will take the main task for processing data and show the result to user computer
  •  <b:includable id='nextprev'>: this includable will add the link 'next page' ,'prev pag' at the bottom of homepage ,archive page ,and add the link 'next post','previous post' at the bottom of single post .
  • <b:includable id='mobile-nextprev'> this includable do the same task to nextprev includable above ,but this includable will work if you browse the blog in mobile .
  • <b:includable id='post' var='post'> this includable will process the data of each post ,it will show post title,post body ,date .... if you are reading a single post ,and show post summary if you are in homepage or archive page
  • <b:includable id='mobile-index-post' var='post'> like 'post' includable above ,but it work on mobile
  • <b:includable id='postQuickEdit' var='post'> this includable will add an small pencil at the end of post ,that allow blog owner can edit the post easily ,click on this pencil ,blog owner will be redirected to post editing window ,don't need to back to dashboard ,and search for post which he want to edit from post list.
  • <b:includable id='shareButtons' var='post'> this includable will show a list of share buttons at the end of post
  • <b:includable id='comments' var='post'> show all comments of each post .
  • <b:includable id='commentDeleteIcon' var='comment'> add a recycle bin symbol next to the comment ,allow blog owner delete unwanted comment .
  • <b:includable id='comment-form' var='post'> show the comment form bellow the post ,allow reader to write their comment .
  • <b:includable id='backlinks' var='post'> show the backlinks to a post .
  • <b:includable id='backlinkDeleteIcon' var='backlink'> show the recycle bin icon next t'o the backlink
  • <b:includable id='feedLinks'> and <b:includable id='feedLinksBody' var='links'> :show the feed links to blog and to each post .
  • <b:includable id='status-message'> show the status message ,like this ' show all post under label xyz '

Blogpost work as diagram bellow


1,When Blogpost widget start working
2,It start a loop statement to looping through all post
3,If the post counting number i smaller than the number of post ,it will call the post includable for showing post data (post title ,post body ,author ,labels...)
4a,4b,4c In the post includable ,if the current page is a single post ,it also call other includables such as post edit icon ,comment ,comment form ... ,but if current page is homepage or an archive page ,these includable will not be called .
5,Go to the next post and back to the check point at step 3
6,In case of finish looping through all posts ,back to the main includable
7,Call next prev includable (or feedlinks,backlinks...if necessary) ,add the link to next and previous post to the end of page .
8,Finish

In these includable ,beside data tags ,we can add HTML ,javascript to make it display as we want .
Combine this post with previous post on data tags,widget structure ,looping and conditional statement ,you will get a big picture on how a template work when reading the code .
Hope this post helpful to you

Wednesday, July 27, 2011

How to make a blogger template : data tags -part 2

In previous post ,I told you about data tags for some widgets . In this post ,we continue to the last and most important widget : blogpost widget . This widget is used to show posts in a blog . Without this widget ,we can't blogging .

Now let's see blogpost widget's data tags :
  •     <data:feedLinks/>: A list of feeds for this page. On the main page, this will contain the main blog feeds; on item pages, this will also contain comments feeds. Each item in this list contains the following:
  •     <data:feedLinks.url/>: The feed URL.
  •     <data:feedLinks.name/>: The feed name (i.e. 'Posts' or 'Comments').
  •     <data:feedLinks.feedType/>: The type of feed (Atom or RSS).
  •     <data:feedLinks.mimeType/>: The mime type of the feed.
  •     <data:olderPageUrl/>: If there are older posts than the ones on the current page, this is a URL to those posts. Context-sensitive for page type. (Not all pages will have this link.)
  •     <data:olderPageTitle/>: Title of the link to the older page of posts. It's usually the text "Older Posts"
  •     <data:newerPageUrl/>: The newer equivalent of olderPageUrl.
  •     <data:newerPageTitle/>: The newer equivalent of olderPageTitle.
  •     <data:commentLabel/>: The phrase to use to show the number of comments, e.g. "comments."
  •     <data:authorLabel/>: The phrase to use to indicate who wrote the post, e.g. "posted by."
  •     <data:timestampLabel/>: The phrase to use to indicate when the post was written, e.g. "posted at."
  •     <data:postLabelsLabel/>: Phrase to introduce the list of post labels, e.g. "labels for this post."
  •     <data:backlinksLabel/>: Phrase to describe backlinks to this post, e.g. "links to this post."
  •     <data:posts/>: A list of all posts for this page. You can consider it a set ,and each post is an item in this set . We can refer to post's properties by the following tags:
  •     <data:post.dateHeader/>: The date of this post, only present if this is the first post in the list that was posted on this day.
  •     <data:post.id/>: The numeric post ID.
  •     <data:post.title/:> The post's title.
  •     <data:post.body/>: The content of the post.
  •     <data:post.author/>: The display name of the post author.
  •     <data:post.url/>: The permalink of this post.
  •     <data:post.timestamp/>: The post's timestamp. Unlike dateHeader, this exists for every post.
  •     <data:post.labels/>: The list of the post's labels. Each label contains the following:
  •     <data:label.name/>: The label text.
  •     <data:label.url/>: The URL of the page that lists all posts in this blog with this label.
  •     <data:label.isLast/>: True or false. Whether this label is the last one in the list (useful for placing commas).
  •     <data:post.allowComments/>: 'True' if this post allows comments.
  •     <data:post.numComments/>: The number of comments on this post.
  •     <data:post.showBacklinks>: Whether to show backlinks for this post.
  •     <data:post.numBacklinks/>: Number of backlinks for this post.
  •     <data:post.addCommentUrl/>: The URL of the 'add a comment' form for this post.
  •     <data:post.emailPostUrl/>: The URL of the 'email this post' form for this post.
  •     <data:post.editUrl/>: The URL of the edit form for this post.
  •     <data:feedLinks/>: A list of feeds specific to this post. (This is different from the overall blog feedLinks, as it may contain a feed for the post's comments, for instance.) Each contains the following:
  •     <data:feedLink.url/>: The feed URL.
  •     <data:feedLink.name/>: The feed name (e.g. 'Posts' or 'Comments').
  •     <data:feedLink.feedType/>: The type of feed (Atom or RSS).
  •     <data:feedLink.mimeType/>: The mime type of the feed.
  •     <data:comments/>: A list of all comments for this post (on item pages only). Each contains the following:
  •     <data:comment.id/>: The numeric ID of the comment.
  •     <data:comment.body/>: The body of the comment.
  •     <data:comment.timestamp/>: The time the comment was created.
  •     <data:comment.author/>: The display name of the comment's author, or 'Anonymous'.
  •     <data:comment.authorUrl/>: URL of the comment author's profile, if the comment is not anonymous.
  •     <data:comment.deleteUrl/>: The URL for deleting this comment.
  •     <data:comment.isDeleted/>: Whether this comment has been deleted. (The text of deleted comments is replaced with a placeholder.) 

Friday, July 15, 2011

How to make a blogger template : the body and APIs

In previous post ,I told you about the header of a blogger template . The next part should be the CSS part  ,but as you know ,we use the CSS to define how elements in body displayed (post color ,font,size...),so in this post ,I want to show you what is in the body of a template APIs and HTML markup ,then we will back to the CSS to define how they displayed .


The <body> part of a template is made up primarily of 'sections' and 'widgets'.
Sections mark out areas of a page, such as the sidebar, footer, etc.
There are many widgets in a section .
A widget is an individual page element such as a picture, a blogroll, or anything else we can add from the Page Elements tab.
In body part ,we can add HTML around 'sections' or add them inside 'widgets'

Each section has an opening and a closing tag, looking something like this:

<b:section id='header' class='header' maxwidgets="1" showaddelement="no">
</b:section>

A <b:section> tag can have the following attributes:
  •  id - (Required) A unique name, with letters and numbers only.
  • class - (Optional) Common class names are 'navbar,' 'header,' 'main,' 'sidebar,' and 'footer.' You can use any name if you want ,or use google default . You can write some CSS tags to define how a 'class' look in CSS section .
  • maxwidgets - (Optional) The maximum number of widgets to allow in this section. If you don't specify a limit, there won't be one.
  • showaddelement - (Optional) Can be 'yes' or 'no,' with 'yes' as the default. If it is 'yes' ,you can add more widgets to this section ,in the section area ,you will see a link 'Add a Page Element' ,if the value is 'no' ,there's nothing .
  • growth - (Optional) Can be 'horizontal' or 'vertical,' with 'vertical' as the default. This determines whether widgets within this section are arranged side-by-side or stacked.
In a section ,there are many widgets , each widget can do a specific task ,for example : showing blog post content ,showing rss links ...
A widget also has an opening and a closing tags ,like this :
<b:widget id="header" type='HeaderView' locked="yes"/> 
..............
</b:widget/>

A widget can contain HTML tags and Blogger APIs for different works , but in the simplest form ,it's only

<b:widget id="header" type='HeaderView' locked="yes"/> </b:widget/>
with nothing inside ,just a placeholder indicating how the widget should be handled in Page Elements tab .

A widget may have the following attributes:

  •     id - (Required) May contain letters and numbers only, and each widget ID in your template should be unique. A widget's ID cannot be changed without deleting the widget and creating a new one.
  •     type - (Required) Indicates what kind of a widget it is, and should be one of the valid widget types listed below.
  •     locked - (Optional) Can be 'yes' or 'no,' with 'no' as the default. A locked widget cannot be moved or deleted from the Page Elements tab.
  •     title - (Optional) A display title for the widget. If none is specified, a default title such as 'List1' will be used.
  •     pageType - (Optional) Can be 'all,' 'archive,' 'main,' or 'item,' with 'all' as the default. The widget will display only on the designated pages of your blog. (All widgets display on the Page Elements tab, regardless of thier pageType.)

The types of widgets you can specify are:

  •     BlogArchive
  •     Blog
  •     Feed
  •     Header
  •     HTML
  •     SingleImage
  •     LinkList
  •     List
  •     Logo
  •     BlogProfile
  •     Navbar
  •     VideoBar
  •     NewsBar

That's all for sections and widgets ,in the next post ,we will examine what is in a widget and APIs :D

Tuesday, July 12, 2011

How to make a blogger template : the header

As mentioned in previous post on blogger template structure ,there are 4 main parts in a blogger template . Part 1 contain information on xml format ,and we can ignore this part because there's nothing to do here .
For the part 2 ,the header ,here is the first thing we should care for a blogger template .

In a default blogger template , there are only two lines in this part :
 <b:include data='blog' name='all-head-content'/>
    <title><data:blog.pageTitle/></title>

The first line
 <b:include data='blog' name='all-head-content'/>
 
will insert necessary meta tags to the header automatically . If you view source code of a page in your blogspot's blog ,what will you see ? Something like that :

 <meta content='text/html; charset=UTF-8' http-equiv='Content-Type'/>
<meta content='true' name='MSSmartTagsPreventParsing'/>
<meta content='blogger' name='generator'/>
.....................
There's no line  <b:include data='blog' name='all-head-content'/> .
It's replaced with meta tags , links to favicon ,link to default CSS, script file...

The next one
<title><data:blog.pageTitle/></title>
is rendered to the title tag in header
<title>blog titles .....blah blah ...</title> 

What should we do with header ?

-You can add your own meta tags for 'site description' ,'keywords' , like these :
<meta content='your blog description goes here' name='description'/>
        <meta content='your blog keywords ....' name='keywords'/>  
-Add your own favicon
<link href='link to your favicon.ico' rel='icon' type='image/vnd.microsoft.icon'/>
-Add link to outside script files or css files

A small tip

Every page in blog should have description and keywords that close to the page's content,it's what google said in their SEO tip .
In Blogger ,we can't follow this advice exactly ,but we can try our best ,by using what Blogger provide .

We can use this code in the header
<b:if cond='data:blog.pageType == &quot;index&quot;'>
<title><data:blog.title/></title>
......... meta tags for the homepage ....
<b:else/>
<b:if cond='data:blog.pageType == &quot;archive&quot;'>
<title><data:blog.title/></title>
....meta tags for category page (or archive page)....
<b:else/>
<b:if cond='data:blog.pageType == &quot;item&quot;'>
<title><data:blog.pageName/></title>
.... meta tags for single post ...

</b:if>
</b:if>
</b:if>

The code above means : 

-if the current page is homepage ,it show the meta tags for homepage in header and blog title in title
-if the current page is category page ( page that contain a list of posts under a specific category ) ,it show the meta tags for category page in header and blog title in title
-if the current page is a single post ,it show meta tags in header and title of post in title .

By using this code ,we can narrow the meta tag (keywords,page description) and title for every page type . Although we can't add keywords ,page description for a specific post ,but it's still better than do nothing ,isn't it ?
That's all for the header . In the next posts ,I will move to other parts in a blogger template , steps to make a HTML template , convert it to Blogger , and tools for this work .

Monday, July 11, 2011

How to make a blogger template : Blogger template structure

Blogger team tried to make their product more easier to use and customization for all users with their template design funtion . If you want some changes in fonts ,background ,layout...,this function can help you . But if you want more ? want to make your own blogger blog look like a professional website ? It's time you need to know something about structure of blogger template ,apis ,scripts ... to make your own .
I will make a post series on How to make a blogger template ,so you can make one for yourself or can do the customizsation easily . I will try to make it short ,and easy to understand , hope it helpful for you .


Here is the first post on this topic : Blogger template structure

Blogger template is written in xml markup language ,a  complete template has 4 section as mentioned bellow(this is my way to describe a template ,not Google ^^ )

1,The first section will contain something like this
This part will define the document bellow is in xml format ,the standard of this xml ,and something else related . I'm not a professional developer and do not know much on xml ,so I can't explain you more about this part ^^ This part is required but fortunately ,we don't need to make anychanges on them .

2,The second section : This section start from <head> to <b:skin> , it contain necessary tags for header ,meta tags , link to favicon... like other html documents . In this section ,we can add favicon ,adding some meta tags for description ,keywords ..

3,The third section : Start from <b:skin> and end at </b:skin> ,it contain CSS tags ,that set the appearance of your blog . This CSS define how an element in blog look like ,such as text color ,font size ,color ,background ... All tags in this part are follow the standard of CSS without any exception or 'CSS tags for Blogger only' ,so if you have some basic knowledge on this field ,you can easily modify them as you want .

4,The forth part start from <body> end at </body>  :  the main part of a template ,it made up primarily with 'section' and 'widget' . In sections and widgets ,there are Blogger APIs for specific tasks .
We have many 'sections' ,one for showing posts ,others for show banner in header ,or showing footer ...
In the section for showing post ,we have widget for showing single post , widget for showing posts in categories ,widget for showing posts in homepage ...
In a widget ,for instance ,widget showing single post ,we have Blogger APIs for showing date ,time ,post header ,post body ...

Beside APIs,we can use HTML tags to arrange elements and make them display as we want .
This is similar to Wordpress template ,if you ever work with them before .

Other element that I usually use in Simplex's template is scripts . Scripts can be anywhere in part 3 and 4 ,but in some cases ,we need to grouped them or move them to the end of template (before </html> ) to avoid conflicting .
That's all for template structure ,in the next posts ,I will go deeper in each part .

Wednesday, July 6, 2011

How to solve CSS errors in Blogger template using Firebug

Knowing CSS can help you in solving Blogger template errors ,or make some customization . But how to do that ? how to find where is the trouble or find what CSS attribute you need to change when  make customization ? In this post ,I will show you what I did : using Firebug (a Firefox add-on ) to work with CSS .
Firebug is a great add-on of Firefox browser ,it's very popular in web development because it can help us inspecting website elements ,debugging errors in CSS ,script ,seeing web layout ....
To use Firebug ,first ,Firefox browser must be installed in your PC . Then go to website : http://getfirebug.com/ ,click on Install Firebug to get the latest version and installed this add-on to Firefox .

After installing Firebug ,you will see an new button in browser window ,this button has the image of a bug .

Enter the Blogger blog you want to fix errors or make customization
When the page fully loaded ,click on firebug button ,the firebug window will appear at the bottom of browser window .

Click on the arrow button in firebug window
 
After click this button ,there will be a rectangle around the element that the mouse is pointing .  Move your mouse pointer to the element you want to change size or fix error
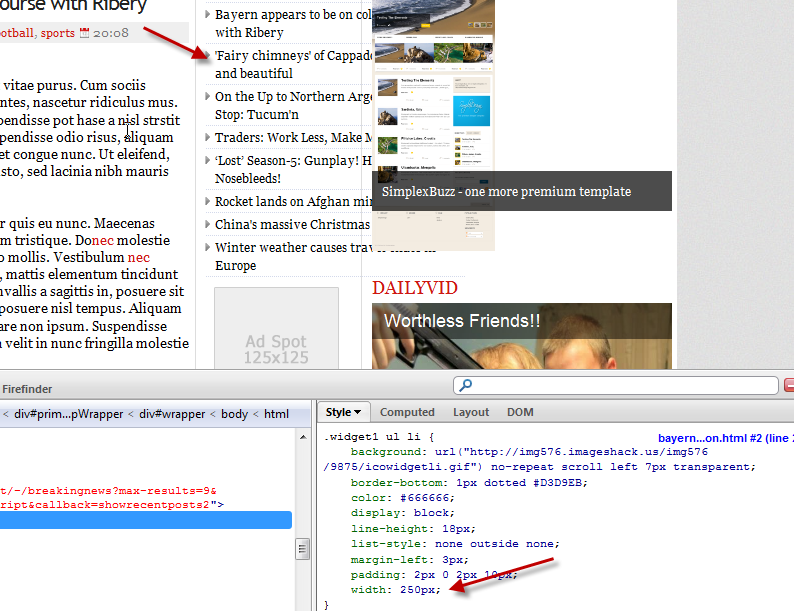
In the right panel of firebug window ,you will see the CSS tags of element which you are pointing .


You can click on the value of these CSS attributes to change value of them ,for example ,in this picture ,I changed width of an element in the right panel ,and see how it look after changing immediately in browser window .
You can also add more attributes to a CSS tags to make it display as you want ,for example ,you want color of all text in an element changed to white color,just right click on right-panel and ,choose new property ,and then add color:#fff;

That's very easy and fun because you can see how your site is right after making changes .

But how to know which CSS need to change ,or meaning of CSS tags or what need to add to make it display as you want ? You can see it easily in my previous post : 31 online CSS cheatsheets that may helpful .

You can use Firebug to see the element layout ,the right or left margin ,padding... in Layout tab in right panel .
When you finish the work ,just go to Blogger template (xml file) ,and add the tags or attributes that you've just added in Firebugs to your template .
There're many functions that Firebug can help you in finding bugs and fixing errors .It's very easy to use ,believe me ,just need a little of time ,you can handle this software and make it work for you ^^

Monday, June 20, 2011

Useful online mind mapping and brainstorming tools

Concept mapping and Mind mapping software are used to create diagrams of relationships between concepts, ideas or other pieces of information,by using this ,all ideas are connected and we get a greater image . It is used by individuals, corporate teams, students and teachers alike for various purposes.
As bloggers,we can use this technique for brainstorming ,getting new idea for blogging . In this post, I want to show you some online tools for mind mapping .

1. Spider scribe

Spiderscribe

SpiderScribe is a user friendly, free and online collaborative mind mapping tool for project management and brainstorming. With this flexible tool you can create freestyle and multi-directional maps – and combine them with elements such as images, text, files, calendar events and geographic locations.

2. Mindmeister

mind meister

MindMeister is the most simplistic mind mapping tool , but its simplicity is definitely an asset. Once you’re logged into the service, you can create a fully functionalmind map using little more than the directional arrows and the Insert key to add new nodes to your map.You can set font size ,node colors ... ,and exporting file to popular format PDF, JPG, PNG, or GIF.

3. WiseMapping

wisemapping

WiseMapping is a free online mindmapping and collaboration tool which helps in Creating mind maps online, invite friends as contributors (useful when working in a team), save maps as PDF, and more. The drag’n’drop capabilities of WiseMapping make it easy to build up your diagram.

4. Mind42


Mind42

Cool mind mapping tool for creating highly customizable organization charts. Each chart node can be colored, converted to an image, supplemented with a custom icon, link, attachment and more.

5. Mindomo


Mindomo

Mindomo is an online mind map Software where users can create, view and share mind maps in their browser. Mindomo is offering the basic services for free, while charging for advanced features. Unregistered users can view the mind maps, while registered users are permitted to create and share mind maps.

6. Gliffy


Gliffy

Extremely powerful techy-oriented diagram creation and collaboration tool, create anything from basic flow-chart diagrams to well-documented troubleshooting guides.

7. XMind


Xmind

The interface is simple and intuitive to use. You can quickly move through your entire mind map with only a handful of keystrokes or jump over to the outline view for even quicker navigation. In addition to a basic mind map you can also create fishbone, organizational, tree, and logic charts. You can export charts as HTML, images, or text, and XMind comes a free account on XMind.net which allows you to share your charts online and embed them into blogs and web sites.

8. Glinkr


Glinkr

Map and share your views of contents on the Web.It's a free tool,easy to use .

9. Solvr


Solvr

An interesting tool for getting solutions from others . You have a problem ,share it on Solvr, you have a link ,you can send this link to your friends ,or submit it to a forum,social networks .Every people who have the link can go to Solvr and share the solution to solve the problem .

10. Bubbl.us


bubbl.us

Mind mapping is a fantastic way to sketch out ideas and do some really productive brainstorming. Bubbl.us is a mind-mapping product aimed towards exactly anyone who needs help organizing their thoughts or any jumbled information. Powered by Flash, Bubbl.us makes it easy for anyone to quickly start planning and sorting out their ideas through the use of linked text bubbles.

11. iMindMap


iMind

iMindMap takes a different approach to mapping than the other applications in the list. Rather than create new nodes off the main idea by adding boxes, nodes are created by clicking in the center or the main idea and drawing away from it with the mouse. Each new idea is a branch off the center. Strangely, many of basic feature available in free mind-mapping software are only found in the more expensive versions of iMindMap, like the ability to expand and collapse branches. Mind maps created in iMindMap can be exported as PDF, JPG, PNG and text outline.

Saturday, June 11, 2011

Creating a Blog Concept for New Bloggers

This guest post is by Mariana Ashley

One of the most difficult aspects of starting up a blog is creating a concept. Especially when creating a blog intended to collect ad revenue or your first official "serious" blog (as in, you want this blog to have thousands of subscribers and launch you into a blogging career), devising a foundation that will unify all your potential posts and ideas can become terrifyingly daunting. Any experienced or successful blogging guru will tell you that planning is critical in this phase of blogging. Fortunately, the variety of methods for planning and creating a blog is currently approaching infinity.

Stop and Ask Why


This is a crucial step that not enough bloggers do. In order to have a successful blog, you have to define and redefine the purpose of your blog. This may include some personal goals like "keep my writing skills up" or "have an online presence for my work." Remember that you should also ask why your blog will be read by others. What purpose will it serve for them? Will it serve a valuable niche topic? Will it provide good information that is otherwise hard to find? There are never too many why questions to ask before starting a project. The more you define why you are creating the blog and why it will be important to others, the more valuable and focused your blog will become in the end result.

Research


First and foremost, research research research! You should be reading any and every blog related to any idea you might want to blog about. If you don't have a feed reader, get one now! Seriously, if you want to consider yourself a blogger and don't want your life to become a nightmare of bookmarking and internet history searching, you need a reader like any aspiring author needs a bookshelf (or milk crates if they're on a budget).

As a Google fan, I use Google Reader to aggregate my feeds, but I recently started using Feedly (which basically transforms Google Reader into a personalized magazine) to consume my feeds. Since many readers allow you to integrate, import, or export your feeds, you can easily experiment with various readers and see what works best for you. Remember to organize your feeds and create a folder for blogs that give you inspiration for your new concept.

Brainstorm


Believe it or not, brainstorming is an essential process of project planning that too few bloggers (and countless other professions for that matter) actually implement. With all the free (usually for at least some limited service) project planning software and web applications available, there's no excuse to forgo this planning step. Of course, Word or Notepad – or even a physical sheet of paper and a pen – are all you really need to brainstorm, but it can be fun to get fancy.

Of course, it's a good idea to define any purpose and principles of your blog before jumping into brainstorming, but it's by no means a necessity. Just blindly brainstorming blog topics can become a huge benefit and give you ideas for your blog that you would never have thought about during research.

About Author

Mariana Ashley is a freelance writer who particularly enjoys writing about online colleges. She loves receiving reader feedback, which can be directed to mariana.ashley031@gmail.com

Saturday, May 28, 2011

Create a Bad word filter in Blogger comment

In your blog ,have you ever seen the bad word in comments ? Does it get annoyed other readers ? If the answer is yes ,you may need this one . I created a script for filtering bad word in comments .You just need to make a list of bad words ,and all the words in this list will be replaced with *

How we do that ?

1,Go to Blogger Dashboard -> Design ->Edit HTML .Checked on Expand wiget templates . Backup template before making any changes .

2,Find <body> and add this code right before
<script type='text/javascript'>
//<![CDATA[
function badwordfilter(ID){
var comm = document.getElementById(ID);
var comment = comm.innerHTML;
var reBadWords = /badword1|badword2/gi;
comment1 = comment.replace(reBadWords, "****");
comm.innerHTML = comment1;
comm.style.display = "block";
}
//]]>
</script>

please pay attention to the text in black bold above,it's the list of bad words .You can add more word to this list and separate each of them with a | ,like this
badword1|badword2|badword3|....|...
do not remove / at the start and /gi at the end .

3,Find and replace

<p>   <data:comment.body/></p>

with

<p>
                                                                                 <div expr:id='data:comment.id' style='display:none;'>
                                                                                     <data:comment.body/>
                                                                                 </div>
                                                                                 <script type='text/javascript'>badwordfilter(&quot;<data:comment.id/>&quot;);</script>

That's all .Save template and see the changes

Monday, April 25, 2011

Tips for Finding the Perfect Blogger Template

Some of readers mailed to me ask for which template should they use for blog? or ask me the template they are using good or not ? In fact ,choosing a template is up to the blog owner ,not me ^^ Angela Quint from Ultrasound has some advice for you in this case .This is a guest post from Angela Quint


Did you know there are more than 10 million blogs online today? If you’re a beginning blogger, there are probably almost that many questions going through your head. One of the first questions you probably have is how to choose the right blogging template. There are thousands of templates available, including ones that are free and ones for which you pay. It’s a crucial decision, so here are a few tips that will help you pick the perfect template for your blog.

1,To Pay or Not to Pay?

Should you pay for your template? That depends on two things: how serious are you about your blog and how much computer experience do you have? If your blog is a business venture, you need it to look as professional as possible, especially if you want to monetize the site. Some premium templates are ad placement ready, which makes formatting easy.
Another big advantage of purchasing a template is that you normally get better support. If problems arise, you’ll have help at the ready and you won’t have to be a techie to keep the site functioning properly.
If you decide to buy a template, think of it as in investment in the future wellbeing of your blog.

2,Start with 2 Columns

Although there are many one and three column templates available, most bloggers agree that a two-column format is easiest to manage. One column is too simplistic and three columns gets complicated. Two columns allows you to keep the site clean but functional, with the current post on one side and the search, ads, and other elements on the other.

3,Make it Relevant to Your Niche

You have a few seconds to capture your reader’s interest. That’s why the header you use is vital. Think about the focus of your blog and the people you want to read it. Make the graphic in the heading relate to the topic. You might love kittens, but if your blog is about golf, that adorable kitty graphic isn’t relevant. If your reader loves golf but isn’t in to cats, you’ve lost him as soon as he clicks on the page.
After you have more experience, you may learn to change the heading picture, but when you’re just starting out, it’s wisest to pick a template with a relevant graphic.

4,Functionality is Key

Do you want your readers to be able to leave comments? Do you want to add pictures to each post? Is there a search function? You need to narrow down what features your blog needs and then eliminate templates that don’t offer those elements. Make sure you test each of the features and check for broken links. Your blog needs to flow smoothly from page to page to keep readers happy.
Most importantly, know what the purpose of your blog is. By keying in on your goals, you’ll be better prepared to select the perfect template for your blog.

About Author

Angela Quint is an ultrasound technician by day and a blogger by night. She enjoys writing to share her love of health and wellness with others!

Thursday, April 14, 2011

Make credit box for each author in a multi-author blog

You have a blog with many authors who contribute content ,and you want to show their short bio in credit box at the end of each post . This idea was in Wordpress for a long time ,but not in Blogger . I tried several times ,but none of them work . Thanks to comment of ابن الملكـة

He gave me a code that work in a comment ,and now I want to share this code here .Both of me and ابن الملكـة hope this code helpful to you all ,and make Blogger to be the best of blogging platform .


 Here is what we need to do :

1,First ,you find this line <data:post.body/>
and then paste the following code right after the line above.
<div style='clear:both'/>        
                                    
                                      <div id='creditbox'>
                                          <!-- Author Bio info start-->
                                          <b:if cond='data:blog.pageType == "item"'>
                                       
  <!-- First Author Info -->
                                             <b:if cond='data:post.author == "NAME OF FIRST AUTHOR"'>
                                                 <img class='authoravatar' height='39' src='IMAGE URL FOR FIRST AUTHOR' width='39'/>
                                                 <div class='postauthor'>                                                     
                                                     <h3><a href='FIRST AUTHOR'S URL'>NAME OF FIRST AUTHOR </a></h3>
                                                     <p> NOTES ABOUT FIRST AUTHOR </p>
                                                 </div>
                                                 <div style='clear:both'/>        
                                             </b:if>

<!-- Second Author Info -->
                                             <b:if cond='data:post.author == "NAME OF SECOND AUTHOR"'>
                                                 <img class='authoravatar' height='39' src='IMAGE URL FOR SECOND AUTHOR' width='39'/>
                                                 <div class='postauthor'>                                                     
                                                     <h3><a href='SECOND AUTHOR'S URL'>NAME OF SECOND AUTHOR </a></h3>
                                                     <p> NOTES ABOUT SECOND AUTHOR </p>
                                                 </div>
                                                 <div style='clear:both'/>        
                                             </b:if>

.......................
                                         </b:if>
                                         <!-- Author Bio info End-->
                                     </div>
<div style='clear:both'/>       

Notes :
1- NAME OF FIRST AUTHOR : replace this with name of your first author . Name of author must be as exact as name showed in profile .
2- NAME OF second AUTHOR :replace this with name of your second author
3- IMAGE URL FOR FIRST AUTHOR :Replace this with the link to your first author avatar or image .
4- IMAGE URL FOR second AUTHOR :Replace this with the link to your first author avatar or image.
5- NOTES ABOUT FIRST AUTHOR : Replace this with author short bio ,profile ...
6- NOTES ABOUT second AUTHOR : Replace this with author short bio ,profile ...
7- FIRST AUTHOR'S URL :Replace this with link to author profile page or link to a social network account.
8- SECOND AUTHOR'S URL :Replace this with link to author profile page or link to a social network account.

In case of there are more than one <data:post.body/> in the search result ,you can paste this code right after all the results  .
If you have more than two authors ,you can duplicate the code of first author's information or second author's information and then change the name,link,bio...

2,Add this CSS code before <body> to decorate the credit box :
<style>
                                     #creditbox {
                                       background: none repeat scroll 0 0 #EDEDED;
                                       padding: 10px;
                                       margin-top:10px;}
                                       .authoravatar {float:left;margin-right:10px;padding:4px;background:#fff;border:1px solid #f0f0f0;}
                                       .postauthor {float:left;}
                                     </style>

This is an example .You can add more CSS tags to make the credit box display as you want .
 Here is my credit box in Simplex Celebrity template


That's all for making credit box in a multi-author blog .Thanks ابن الملكـة again for this helpful tip .

Thursday, April 7, 2011

Beyond Design: 5 Tips for Making Your Blog More Reader-Friendly


This guest post was written by Alvina Lopez of accredited online colleges

For those of you bloggers who are knowledgeable about the ins and outs of website design, you definitely have a leg up in the blogosphere, as most bloggers aren't completely aware how much a blog's layout and color scheme affects a reader's attention. At the same time, however, there are a few other considerations that design-centric bloggers might want to keep in mind, especially in terms of writing. Here are just a few:

1. The title is more important than you think.

Titles are something that some bloggers put more emphasis on than others. But we could all do with placing a particular importance on making each title something special. It is, after all the first thing our readers lay their eyes on. When thinking of titles, consider your own browsing history. When you read the news online, which articles do you tend to click on? How are their respective titles worded? Checking articles that top the most popular lists is also a good way to improve your blog titles.

2. Paragraphs and blog posts that are too long turn off lots of net readers.

Paragraphs and articles that are too short make you look lazy.
Obviously, most bloggers know that writing paragraphs that are too long can tire readers out. Remember, the Internet is a veritable breeding ground for ADHD. At the same time, however, articles or paragraphs that are super short make your material look skimpy. Find a happy medium, and remember that most Internet readers especially like list posts.

3. Justified paragraphs are pleasing to the eye.

Some may disagree with me on this one, but having justified paragraphs like they do in newspapers is an aesthetic consideration that makes things easier to read. You can do this by hitting the "justify" button on Word if you do take write your first drafts on a word processor. It gives your blog articles a cleaner appearance. Off-setting quoted material in a different-colored box works well, too.

4. The placement of good hyperlinks is absolutely instrumental in drawing and keeping a reader's attention.

Hyperlinks that link out to related material are one of the hallmarks of good blog posts and Internet writing in general. But be careful. Placing too many hyperlinks can overwhelm your readers, and placing too few makes your blog post come off as not very authoritative and lacking supporting sources. Be sure to include links to quality material (i.e. stay away from content farm type stuff).

5. Cycling between the pyramid and inverted pyramid, depending on circumstances, keeps things fun and unpredictable.

Traditional journalists hew to the inverted pyramid when it comes to structuring their articles. That is, they place all the most relevant and important information in the first paragraph, and put unnecessary details further down the article. While this is a good practice for news stories, with blog posts you can shake things up a bit. By doing a right-side up pyramid, in which you tease readers with the more important info toward the bottom, you can effectively get your audience to read with bated breath till the very end. Be careful with this style, however, because it can easily turn into an exercise in boredom. Be sure to make each paragraph interesting and suspenseful in its own right.

About Author

Alvina Lopez is a freelance writer and blog junkie, who blogs about accredited online colleges. She welcomes your comments at her email Id: alvina.lopez @gmail.com.

Friday, April 1, 2011

Blogger offer five dynamic views for readers

Blogger has offered five dynamic views for readers . Now ,we can browse a blog with not only normal blog design ,but also in five different views .With the latest in web technology, including AJAX, HTML5 and CSS3 ,in these views we can :
-Read more posts without having to reload or click to a second page .
-Read posts in different layout (flipcard,sidebar,mosaic,snapshot and timeslide )
-Browse a page faster because images only load when we view ,not all at once .
......
When seeing my blog in these views ,I have to say "Oh,that's so cool"  .

See SimplexDesign blog in different views here


To enable different views to blog:
-Your blog is public. Your readers don’t need to sign in to view your blog.
-Your blog has feeds fully enabled. In the Settings | Site feed tab, you have enabled either Full or Jump Break for your Post Feed.
-You have not disabled dynamic views. In the Setting | Formatting tab, the option for Enable Dynamic Views is set to Yes.

To see a blog in different views , simply add a  /view at the end of blog url . For example ,to see SimplexDesign blog in additional views ,you can go to this address : http://simplexdesign.blogspot.com/view

In all views, search is available in the upper right hand corner. Clicking on the ">" arrow in the very top left of the header bar will slide the header bar across and allow you to choose different views for the current blog as well as type in a new blog URL.

An important thing that these views require modern browsers such as Internet Explorer 8+, Firefox 3.5+, Chrome or Safari. Many elements of these views will not work if you have an older browser.

Please note that these views do not currently support many of the features your original blog may have, including displaying advertisements. Blogger team said that they will let user personalize these views, including providing an option to set a particular view as the default and displaying advertisements over the coming months.

Here is SimplexDesign blog in new views

Sidebar view

Flipcard view

Timeslide view

Mosaic view

Snapshot view

Wednesday, March 30, 2011

Use Google web font to styling header and text in your blog

If you are using default Blogspot templates ,you can use Template Designer to set special fonts for header and text .But this function is not available if you are using a custom template . So how can we embed special fonts to blog ?


As you may know ,Template Designer in Blogspot use Google font for applying special fonts to blog .In this post ,I will show you how to use Google Font for styling text in blog without Template Designer ,just need some lines of code .

You can see demo here ( my template Simplex Newspro )

Here are steps :

1,Go to this site ,and select the font you like .

2,When move your mouse over the font ,you will see the text "Click here to embed...." .Click on this text .A new page appear . Click on Use this font tab


3,You will see two lines :


The first line is something like this  :
<link href='http://fonts.googleapis.com/css?family=xxxxx' rel='stylesheet' type='text/css'>
xxxxx is the font name . Copy this line and paste right before <b:skin><![CDATA[/* in template file . An important thing : you must add an slash ( / ) at the end of this line ,like that
<link href='http://fonts.googleapis.com/css?family=xxxxx' rel='stylesheet' type='text/css'/>
If not ,you will see an error message .

The second line you get in Google web font page is something like this :
h1 { font-family: 'xxxx',xxxxx; }
xxx are font name and style of the font .
 This line illustrate how the font you choose applied to h1 tag .

To applied the font you choose to an element in blog ,find CSS code of this element , and add the attribute  font-family: 'xxxx',xxxxx; into element's CSS attributes

For example ,in my live demo I applied new font to post title in template Simplex Newspro .
Here are steps I did :
First ,I go to this website ,and choose the font Indie Flower
 
Click on "click here to embed Indie Flower"
 
Second ,I go to Dashboard - > Design ->Edit HTML ->Checked on Expand widget templates
Add the first line to embed font Indie Flower


After that ,add the font-family attribute to element I want to apply new font in CSS section


That's all .Save template and new font will be appeared .

In this post ,I just want to show you how to use Google font to embed new fonts to blog . It's very easy if you are familliar with CSS ,work with CSS or customize templates before . If you are a newbie and don't know where to insert font-family attributes to applied new font for an element,you can make a comment . I can help if possible .

Sunday, March 13, 2011

Update for Subscription pop-up

In comments of my previous post "Using Jquery to make an one-time subscription pop-up" ,YellOblog said that he want the pop-up appear after an amount of time and the pop-up is always at the center of viewport .Thanks YellOblog for the suggestion . Here is the complete code for your request :


Live Demo

To make a Subscription Pop-up ,you can read my post  "Using Jquery to make an one-time subscription pop-up" and follow steps from 1 to 3 .

For the step 4 - Jquery code ,replace the code in the post "Using Jquery to make an one-time subscription pop-up"
with this one

<script src="https://ajax.googleapis.com/ajax/libs/jquery/1.5.0/jquery.min.js" type="text/javascript"></script>  
<script src="http://dinhquanghuy.110mb.com/jquery.cookie.js" type="text/javascript"></script>
<script type="text/javascript">
         var popupStatus = 0;

//loading popup with jQuery magic!
function loadPopup(){
    centerPopup();
    //loads popup only if it is disabled
    if(popupStatus==0){
        $("#backgroundPopup").css({
            "opacity": "0.7"
        });
        $("#backgroundPopup").fadeIn("slow");
        $("#popupContact").fadeIn("slow");
        popupStatus = 1;
    }
}

//disabling popup with jQuery magic!
function disablePopup(){
    //disables popup only if it is enabled
    if(popupStatus==1){
        $("#backgroundPopup").fadeOut("slow");
        $("#popupContact").fadeOut("slow");
        popupStatus = 0;
    }
}

//centering popup
function centerPopup(){
    //request data for centering
    var windowWidth = document.documentElement.clientWidth; 
    var windowHeight = document.documentElement.clientHeight; 
    var windowscrolltop = document.documentElement.scrollTop;
    var windowscrollleft = document.documentElement.scrollLeft;
    var popupHeight = $("#popupContact").height();
    var popupWidth = $("#popupContact").width();
    var toppos = windowHeight/2-popupHeight/2+windowscrolltop;
    var leftpos = windowWidth/2-popupWidth/2+windowscrollleft;
    //centering
    $("#popupContact").css({
        "position": "absolute",
        "top": toppos,
        "left": leftpos
    });
    //only need force for IE6
   
    $("#backgroundPopup").css({
        "height": windowHeight
    });
   
}


//CONTROLLING EVENTS IN jQuery
$(document).ready(function(){
    if ($.cookie("anewsletter") != 1) {   
       
        //load popup
        setTimeout("loadPopup()",5000);   
    }       
    //CLOSING POPUP
    //Click the x event!
    $("#popupContactClose").click(function(){
        disablePopup();
        $.cookie("anewsletter", "1", { expires: 7 });
    });
    //Click out event!
    $("#backgroundPopup").click(function(){
        disablePopup();
        $.cookie("anewsletter", "1", { expires: 7 });
    });
    //Press Escape event!
    $(document).keypress(function(e){
        if(e.keyCode==27 && popupStatus==1){
            disablePopup();
            $.cookie("anewsletter", "1", { expires: 7 });
        }
    });

});
</script>

pay attention to this line setTimeout("loadPopup()",5000);
5000 is the delay time in millisecond . You can set another value if you want .
That's all . I hope this update can fill your requests and make the subscription pop-up more profesional. You can check it out yourself and see the result .

Saturday, March 5, 2011

Auto apply lightbox effect to all images

In my blog ,DJ Remix Town asked me for how to auto applied Lightbox effect to all images uploaded ,do not need to edit HTML and add rel="lightbox" manually. And now I have the answer for this question :

How to do this ?

First ,you need to read this post and follow all my instruction for install jquery lightbox to blog .

The magic is on the second step ,find and replace this code
<script type="text/javascript">
$(function() {
$('a[rel*=lightbox]').lightBox();
});
</script>

with this

<script type="text/javascript">
$(function() {
$('a[href$=jpg], a[href$=JPG], a[href$=jpeg], a[href$=JPEG], a[href$=png], a[href$=gif], a[href$=bmp]:has(img)').lightBox();
});
</script>

The difference between them is this line $('a[href$=jpg], a[href$=JPG], a[href$=jpeg], a[href$=JPEG], a[href$=png], a[href$=gif], a[href$=bmp]:has(img)').lightBox(); 
This line mean Lightbox effect will be applied to all <a ...> tag which has an <img> tag inside ,and the href attribute of a tag is a link to image file (with the extension : gif,bmp,jpeg,png,jpg)

From now ,you can upload and insert images to your post using uploader in post editor window and don't care for the rest . Lightbox effect will be applied to all images .

Friday, February 25, 2011

Using Jquery to make an one-time subscription pop-up


Many of bloggers said that a subscription pop-up very helpful in increasing the number of subsriber . Some bloggers such as Johnchow use subscription pop-up to show his new books and ask for subscription from readers .As you can see ,the number of subscriber in Johnchow website is very impressive .
Pop-up good or bad ? I do not mentioned here ^^


In this post ,I've just want to show you how to make a subscription pop-up for your blog . This pop-up will appear in the first-time you visit and it only appear again after several days .

Live Demo

Here are steps for making a pop-up in Blogspot

1,Open template file by go to Blogspot Dashboard ->Design ->Edit HTML . Check the box "Expand widget templates"

2,Add this CSS code right before ]]></b:skin>
#popupContactClose{
cursor: pointer;
text-decoration:none;
}
#backgroundPopup{
display:none;
position:fixed;
_position:absolute; /* hack for internet explorer 6*/
height:100%;
width:100%;
top:0;
left:0;
background:#000000;
border:1px solid #cecece;
z-index:1;
}
#popupContact{
display:none;
position:fixed;
_position:absolute; /* hack for internet explorer 6*/
height:384px;
width:408px;
background:#FFFFFF;
border:2px solid #cecece;
z-index:2;
padding:12px;
font-size:13px;
}
#popupContact h1{
text-align:left;
color:#6FA5FD;
font-size:22px;
font-weight:700;
border-bottom:1px dotted #D3D3D3;
padding-bottom:2px;
margin-bottom:20px;
}
#popupContactClose{
font-size:14px;
line-height:14px;
right:6px;
top:4px;
position:absolute;
color:#6fa5fd;
font-weight:700;
display:block;
}

3,Add this HTML code right before </body>
<div id="popupContact">
         <a id="popupContactClose">x</a>
         <h1>Pop-up title goes here</h1>         
         <p id="contactArea">
             your pop-up content and subscription form ... goes here
         </p>
     </div>
     <div id="backgroundPopup"></div>

This is HTML code of your subscription pop-up .
Replace the text in bold with title of pop-up and pop-up content .
To make this popup becomes a subscription pop-up ,you can add Feedburner subscription code into pop-up content . Like this

<div id="popupContact">
         <a id="popupContactClose">x</a>
         <h1>Subscription to SimplexDesign</h1>         
         <p id="contactArea">
             <form style="border:1px solid #ccc;padding:3px;text-align:center;" action="http://feedburner.google.com/fb/a/mailverify" method="post" target="popupwindow" onsubmit="window.open('http://feedburner.google.com/fb/a/mailverify?uri=Simplex', 'popupwindow', 'scrollbars=yes,width=550,height=520');return true">
                 <p>Enter your email address:</p>
                 <p><input type="text" style="width:140px" name="email"/></p>
                 <input type="hidden" value="Simplex" name="uri"/>
                 <input type="hidden" name="loc" value="en_US"/>
                 <input type="submit" value="Subscribe" />
             </form>

         </p>
     </div>
     <div id="backgroundPopup"></div>

The text in bold is the code of Feedburner subscription form .

You might ask me : how to get Feedburner subscription form ?
It's very easy .If you are using Feedburner ,login to your feedburner account -> click on your blog feed ->click on Publicize tab -> Click on Email Subscriptions -> Active this service -> code of subscription form is in text box .

If you do not use Feedburner ,you can add other code to pop-up content ....

4, Now it's time to add Jquery code . This code will make the pop-up work .
Add this code right before </head>

<script src="https://ajax.googleapis.com/ajax/libs/jquery/1.5.0/jquery.min.js" type="text/javascript"></script>   
<script src="http://dinhquanghuy.110mb.com/jquery.cookie.js" type="text/javascript"></script>
<script type="text/javascript">
     var popupStatus = 0;
//this code will load popup with jQuery magic!
function loadPopup(){
    //loads popup only if it is disabled
    if(popupStatus==0){
        $("#backgroundPopup").css({
            "opacity": "0.7"
        });
        $("#backgroundPopup").fadeIn("slow");
        $("#popupContact").fadeIn("slow");
        popupStatus = 1;
    }
}

//This code will disable popup when click on x!
function disablePopup(){
    //disables popup only if it is enabled
    if(popupStatus==1){
        $("#backgroundPopup").fadeOut("slow");
        $("#popupContact").fadeOut("slow");
        popupStatus = 0;
    }
}

//this code will center popup
function centerPopup(){
    //request data for centering
    var windowWidth = document.documentElement.clientWidth;
    var windowHeight = document.documentElement.clientHeight;
    var popupHeight = $("#popupContact").height();
    var popupWidth = $("#popupContact").width();
    //centering
    $("#popupContact").css({
        "position": "absolute",
        "top": windowHeight/2-popupHeight/2,
        "left": windowWidth/2-popupWidth/2
    });
    //only need force for IE6   
    $("#backgroundPopup").css({
        "height": windowHeight
    });
   
}
//CONTROLLING EVENTS IN jQuery
$(document).ready(function(){
    if ($.cookie("anewsletter") != 1) {   
        //centering with css
        centerPopup();
        //load popup
        loadPopup();   
    }       
    //CLOSING POPUP
    //Click the x event!
    $("#popupContactClose").click(function(){
        disablePopup();
        $.cookie("anewsletter", "1", { expires: 7 });
    });
    //Click out event!
    $("#backgroundPopup").click(function(){
        disablePopup();
        $.cookie("anewsletter", "1", { expires: 7 });
    });
    //Press Escape event!
    $(document).keypress(function(e){
        if(e.keyCode==27 && popupStatus==1){
            disablePopup();
            $.cookie("anewsletter", "1", { expires: 7 });
        }
    });
});
</script>

The pop-up will show if you are first-time visitor to the blog and will not displayed again  for 7 days .
With this feature ,reader will not be annoyed by pop-up each time they visit your blog . After 7 days ,the pop-up will show again to remind visitor to subscribing your blog . You can set the number of days pop-up will be appeared again by set the value of expires: 7 to other value ,for example ,expires: 6 ^^

Note : If error occured when uploading template ,you must encode the script in step 4 by copying the code ,and go to this page ,paste the code in textbox and click on encode . After that copy the result and paste it back to template file .


That's all for subscription pop-up .
You can save template and back to your blog to see the changes.
I hope this post will be helpful